Sternmount Marine Tower Kit Owner’s Manual Version 1.5 Document #0104 REV A
SOUTHWEST WINDPOWER 2/4/05
STERNMOUNT MARINE TOWER KIT
OWNER’S MANUAL
VERSION 1.5
Made in the USA by:
Southwest Windpower
1801 W. Route 66
Flagstaff, AZ 86001
(520) 779-9463
AIR Marine is a trademark of Southwest Windpower Inc.
= Page 1 =
Sternmount Marine Tower Kit Owner’s Manual Version 1.5 Document #0104 REV A
SOUTHWEST WINDPOWER 2/4/05
Notes
STERNMOUNT MARINE TOWER KIT
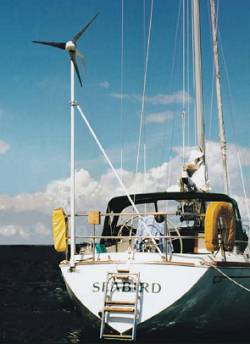
CONGRATULATIONS! You have just purchased the most
advanced marine wind turbine mounting system available. This
tower has been designed to be simp le to install and to reduce the
vibrations that any wind turb ine produces. However, it is
important that you read this manual thoroughly prior to assembly.
If you have any questions on proper installation or usage please
contact either Southwest Wi ndpower or your Dealer for
information.
Notice: This information is believed to be reliable: however,
Southwest Windpower assumes no responsibility for inaccuracies
or omissions. The user of this information and product assumes
full responsibility and risk. All specifications are subject to
change without notice.
Contents:
Step 1:
Site Evaluation
page 4
Step 2:
Saddle Clamp Installation
page 5
Step 3:
Mast Base Assembly
page 6
Step 4:
Mast Base Installation
page 7
Step 5:
Stay Base Installation
page 7
Step 6:
Wiring and Final Assembly page 8
Mast and Stay Specifications
page 10
Drill Guide Template For Poles
page 11
1
= Page 2 =
Sternmount Marine Tower Kit Owner’s Manual Version 1.5 Document #0104 REV A
SOUTHWEST WINDPOWER 2/4/05
Parts List
Your new tower kit includes: Quantity:
• Stainless steel end caps 4
• Mast vibration dampening mount 1
(with bolt, washers,
nut and bracket)
• Stay vibration dampening mounts 2
• Stay base bracket 2
• Mast hinge base angle brackets 2
• Mast saddle straps 4
• Mast wiring grommet 1
•
3
/
8
”-16 x 2” stainless steel
socket head screws 2
•
5
/
16
”-18 x ¾” stainless steel
socket head screws 2
•
5
/
16
”-18 x 1” stainless steel
socket head screws 4
• ¼”-20 x 1-¾” stainless steel
socket head screws 4
• 8-32 x ½ screws 2
•
3
/
8
”-16 nylon lock nuts 2
•
5
/
16
”-18 nylon lock nuts 6
• ¼”-20 nylon lock nuts 4
• 3/8” stainless steel extra thick washer 2
• 3/8” lock washer 2
•
1
/
8
” thick rubber adapter sleeve (for
stainless steel towers only) 1
• Powder coated or stainless steel mast 1
• Powder coated or stainless steel stays 2
Please inspect the contents with the above list to familiarize
yourself with all parts. See addendum for kits not including mast
or stays for correct preparation information.
2
11
= Page 3 =
Sternmount Marine Tower Kit Owner’s Manual Version 1.5 Document #0104 REV A
SOUTHWEST WINDPOWER 2/4/05
Mast and Stay Specifications
For kits not including mast or stays
If you opted to purchase a hardware kit without the mast and
stays, you will need to make your own poles prior to proceeding
with the installation. The materials you will need are:
• (2) Stays of 9-12 foot (2.7m-3.7m) lengths of 1 inch
(25.4mm) outer diameter aluminum pipe with a wall thickness
of 1/8” (3.18mm).
If stainless steel stays are desired, 1 inch (25.4mm) outer
diameter, .095” (2.41mm) wall thickness or thicker pipe is
recommended.
The stays should be long enough to support the tower structure in
high wind conditions and short e nough to allow for proper blade
clearance. Additionally, the angle between the mast and stays
should be within the range illust rated in figures 1 and 2 in the
manual.
• (1) Mast of 9-12 feet (2.7m to 3.7m) of 1-½ schedule 40,
.135” (3.5mm) wall thickness aluminum pipe.
Stainless Steel masts should be 1-½ inch, schedule 10, .10”
(2.8mm) wall thickness pipe (type 304).
NOTE: Actual pipe outside diameter 1.9 inch (48.3mm)
Stays Slip an end cap onto one end of each stay and tighten the set
screw. Use a ¼” (6.4mm) drill to make two holes in each stay,
one side at a time. Use the holes in the end caps as a guide. You
may need to remove any burr or sharp edge left from the drill.
Mast
See diagram for drill sizes an d locations. Insert the rubber
grommet into the large
7
/
8
” (22mm) hole. For masts with thinner
walls, use the 1/8” (3.2mm) silicone adapter.
When the mast and stays have been prepared, continue with
installation beginning with Step1: Site Evaluation.
10
Note
: The mounting materials in cluded in this kit were
designed to be mounted to a wood or fiberglass deck.
It is recommended to use lag screws or through bolts to
mount the brackets to your boat. However, these are not
included in your kit . The exact configuration and hardware
for the attachment of the mast base plate bracket depends on
the construction of your boat. You must use your judgment
to determine how best to attach the brackets to your boat.
Prior to assembly, it is a good id ea to gather all the tools
necessary for the installation. These include:
• power drill
• ¼” drill bit (6.4mm)
• hacksaw with a course tooth blade
• measuring tape
• silicone caulk
• hex wrenches:
7
/
16
”, ½”,
9
/
16
”
• hex keys:
1
/
8
”,
3
/
16
”,
7
/
32
”
• A second person to help you with the installation process.
Once you have checked all your parts and you have gathered all
the necessary tools, you are re ady to begin the installation
process.
Safety and Installation Information
The three most important factor s that must be taken into
consideration when inst alling your tower are SAFETY &
SAFETY followed by performance. It is important to realize that
any wind turbine has high-speed spinning parts and it can be very
dangerous if the turbine is installed improperly!
3
= Page 4 =
Sternmount Marine Tower Kit Owner’s Manual Version 1.5 Document #0104 REV A
SOUTHWEST WINDPOWER 2/4/05
The AIR must be installed in a place high enough so that a
person cannot come in contact with the spinning blades while the turbine is in operation. The second important rule is to locate the AIR in a place where
the turbine is free from obstructions. The more open the area
around the turbine, the better pe rformance you will receive, and
the less the chance your turbine will hit something. Be especially
aware of any overhead obstruc tions (e.g. your boom or sail
rigging).
Step 1:
Site Evaluation
While evaluating your site location, keep in mind that the stays
need to be mounted at least 3.5 feet (1.1m) and no more than 6.5
feet (2.0m) away from the turbine mast (see figure 1). The spread
angle between the stays should be as close to 90 degrees as
possible, plus or minus 20 degrees (see figure 2). If the stays are
to be mounted to a vertical or steeply sloped surface, such as the
bulkhead, these guidelines may not apply.
Figure 1-Safe distances from mast to stays.
4
Follow your turbine manual’s inst ructions for attaching the
turbine to the tower.
Permanently attach the end caps to the stays and bolt the bracket
to the deck. Re-assemble the stay vibration mount (see figure 5).
Raise the mast, with turbine attached, and secure the stays to the
bracket assembly. Tighten all end cap set screws and saddle
clamp hardware. Tighten the bolts at the swivel base from the nut
side (see figure 4).
Maintenance
Periodically tighten all screws a nd bolts in the base brackets
to make sure the tower hardware has not been loosened by
vibration or wear.
9
= Page 5 =
Sternmount Marine Tower Kit Owner’s Manual Version 1.5 Document #0104 REV A
SOUTHWEST WINDPOWER 2/4/05
.
Figure 5-Stay mounting bracket assembly.
Have your assistant raise the mast while you hold the ends of
each stay. As you do this, position each bracket base where they
will provide the most rigid assembly. Determine the proper
length for each stay and if necessary cut them with a hacksaw to
meet the criteria specified in Step 1:Site Evaluation.
When each stay is in the correc t position, mark the bracket hole
location on the deck. Tighten the set screw in the end cap, and
use a ¼” (6.4mm) bit to drill the bolt holes into the stay one side
at a time. Fasten the end caps with a ¼”-20 x 1-1/2 socket head
screw and a ¼”-20 nut. Drill the three bracket holes and mount
the bracket assembly to the deck.
Step 6:
Wiring and Final Assembly
Insert the grommet into the 7/8” (22.2mm) hole in the side of the
tower. Run your wire through the deck from below, through the
grommet and extend the wire 8 inches (20cm) above the mast.
This extra wire will leave enough slack for the tower to be tilted.
Use silicone caulk to seal the hole where the wires pass through.
8
Figure 2-Safe angles between each stay.
Make sure there are no objects below the turbine that would
allow someone to step onto and possibly come in contact with the
operating turbine. It is also very important to find a secure spot
on the deck or transom since the mast and stay bases will be
under stress.
Most wind turbines are installation in the aft portion of the boat,
either on the starboard or port side. This depends on the type of
boat involved.
Step 2:
Saddle Clamp Installation
Carefully lay the mast on the deck with the bottom end (the end
with the drain hole and the wire ho le) closest to the base plate.
Attach one end cap to the drilled end of each stay. Use a ¼”
(6.4mm) drill bit to clear the bolt holes if necessary. Bolt this
assembly to the two saddle clamps as shown in figure 3.
Tighten the support clamps no less than 2 feet (.61m) and no
more than 3 feet (.91m) from the top of the mast and secure.
Tighten the bolt through the saddle clamp and end cap first,
then tighten the other saddle clamp bolt. Either clamp may be
anywhere between 2-3 feet (.61m-.91m) from the top of the mast.
5
= Page 6 =
Sternmount Marine Tower Kit Owner’s Manual Version 1.5 Document #0104 REV A
SOUTHWEST WINDPOWER 2/4/05
Figure 3-Saddle clamp, end cap and stay assembly.
Step 3:
Mast Base Assembly
Push the large noise isolator into the bottom of the mast and
tighten the bolt securely. If you are using a stainless steel mast
instead of an aluminum mast, you must first slip the silicone
adapter onto the rubber isolator before you insert the isolator
into the bottom of the mast. Tightening the bolt will expand the
rubber isolator inside the mast, thereby securing the mast to the
base.
Figure 4-Mast base assembly.
6
After the mast base has been properly secured, thread the two
screws into the side of the tower mast base and tighten.
Step 4:
Mast Base Installation
The mast base plate brackets ar e designed to be mounted with
either the longer side to the deck as shown in figure 4, or with the
short side down, and the long side bolted to the swivel bracket.
Once you have located the spot where you wish to install your
AIR marine, measure and mark the location on the deck or
transom to mount the base plate and stays. You should determine
the direction you want the mast assembly to tilt down toward and
align the base plate appropriate ly. While holding the assembly,
have your assistant mark the loca tion of the bracke t holes. Drill
and fasten the base plate brackets . Pull up on the mast to test the
bond between the mast and the isolator. If the mast slips on the
vibration mount, remove the mast base from the deck and
repeat steps 3 and 4, making sure to securely attach the mast
to the isolator.
Step 5:
Stay Base Installation
By now you should have a good idea where the stay brackets will
be positioned on the deck. Mounting the stays too far apart or too
close together will result in inadequate tower support in high
wind or rough seas. The angle you attach the end caps to the end
of the stays depends on the angl e you place the deck brackets.
The easiest way to complete this task is to perform a “dry run”
installation of the st ays. Without drilling any holes through the
ends of the stays, assemble the stay mounting brackets and insert
a 3/8” bolt through each washer and each rubber insulator. Run
this through each bracket and pla ce another rubber insulator, one
end cap one 1/8” thick washer an d one 3/8” lock washer on each
bolt (see figure 5) . Thread a nut LOOSELY onto each bolt to
hold the two assemblies together
7
= Page 7 =
Air Marine Tower Kit Owners Manual (Text Only)