
You’re thinking about going off-grid. Maybe it’s to save money, gain energy independence, or power a cabin far from the city. Whatever the reason, you wouldn’t want to blindly accept whatever quote your installer hands you, nodding along without really knowing how the system works.
A lot of people want to invest in solar but feel overwhelmed by the technical stuff. That’s exactly why we put this guide together. In this step-by-step guide, we’ll walk you through how an off-grid solar system works, from the key components to designing and installing your setup, all the way to using DIY kits if you're the hands-on type.
How an Off-Grid Solar System Works
An off-grid solar system is designed to provide power entirely from renewable sources without any reliance on the national electricity grid. This means all of your energy needs, from powering lights and running appliances to charging electronics, are met by the energy captured from the sun.

Key Components of an Off-Grid Solar System
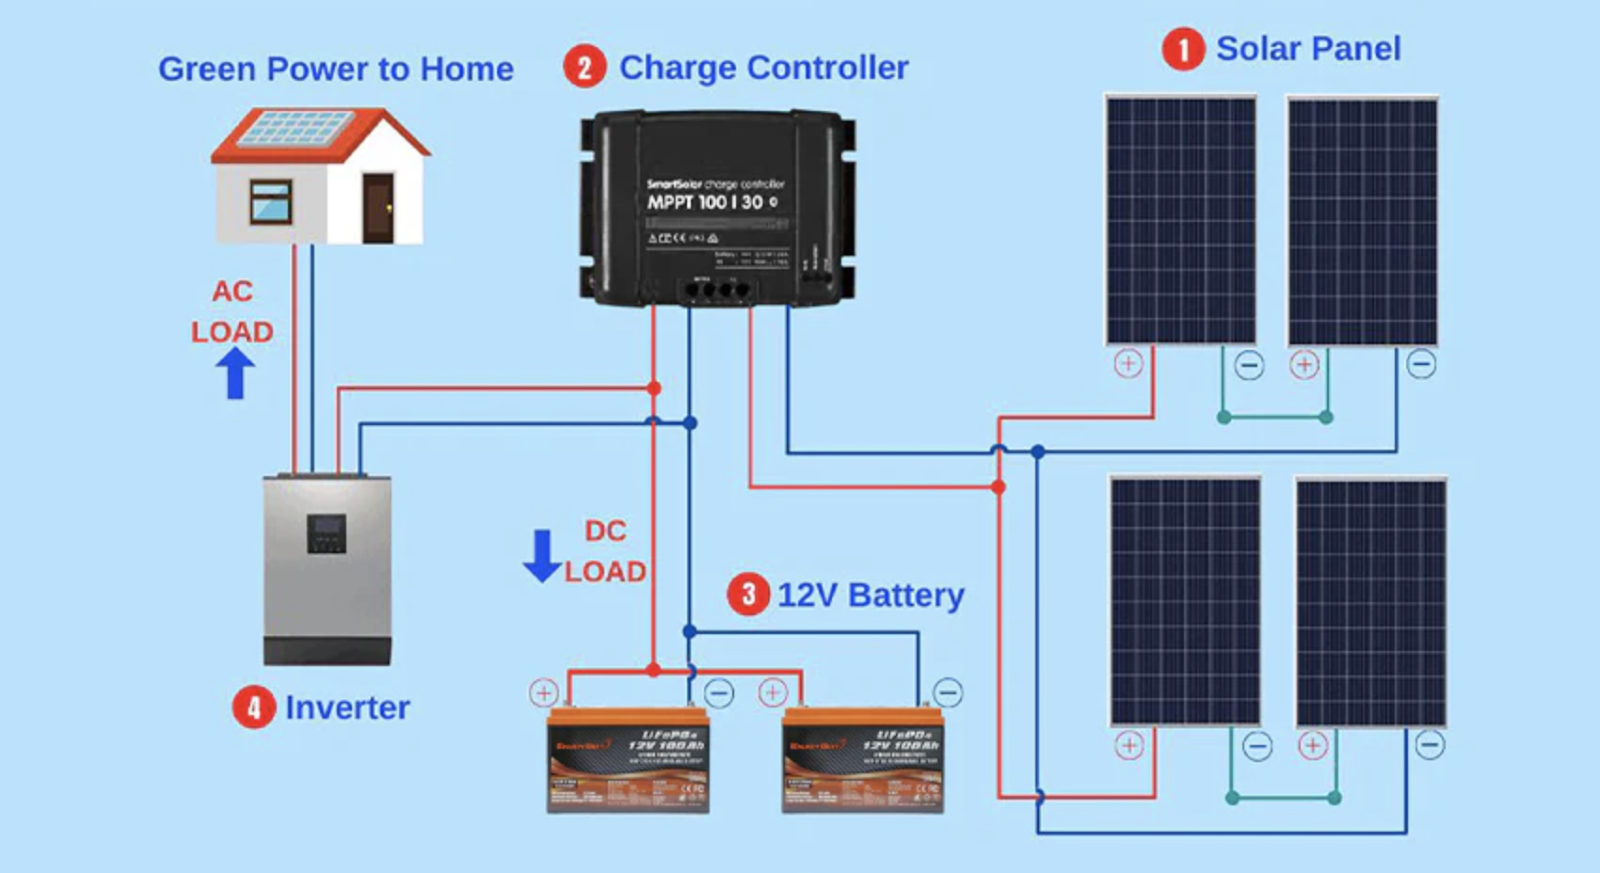
The typical off-grid solar system includes several key components that work together to generate, store, and distribute electricity:
-
Solar Panels: These panels capture sunlight and convert it into direct current (DC) electricity. Solar panels are typically made up of silicon cells that harness energy from the sun. They are the core energy-generating components of the system.
-
Batteries: Since solar panels generate power only when the sun is shining, energy must be stored for use when sunlight is unavailable, such as during the night or on cloudy days. Batteries store the excess energy generated by the panels during the day for later use.
-
Charge Controller: The charge controller is a critical component that regulates the flow of electricity from the solar panels to the batteries. It ensures the batteries are not overcharged or discharged too much, which helps extend their lifespan.
-
Inverter: While solar panels produce DC power, most household appliances run on alternating current (AC). The off-grid inverter converts the DC electricity from the batteries into AC power, which can then be used by your home’s appliances.
How These Components Work Together
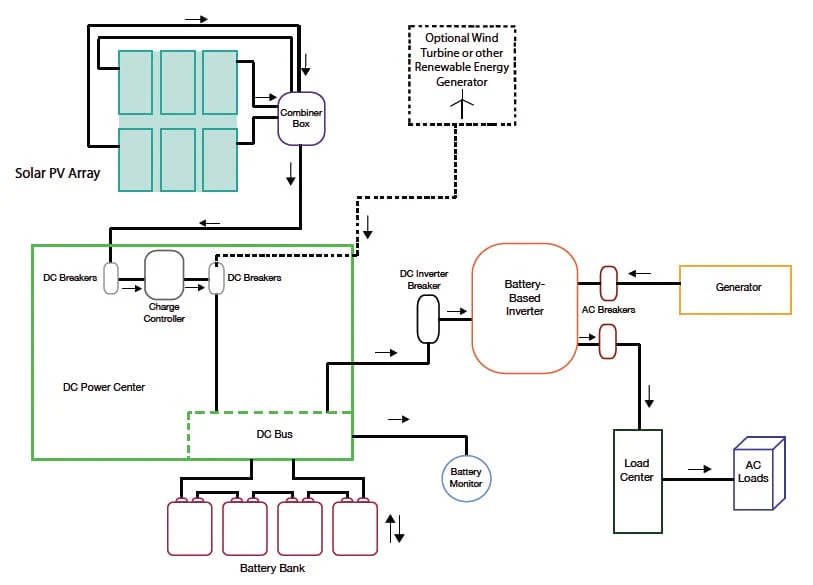
The solar panels capture sunlight and convert it into DC electricity. This energy flows into the charge controller, which directs it to the battery storage system. When you need power, the inverter converts the stored DC electricity into usable AC electricity for your home.
The energy you use from the batteries is replenished as soon as the sun comes out again, maintaining a cycle of energy independence.
An off-grid system is entirely self-sustaining and allows you to rely on the sun’s energy while avoiding utility bills and grid dependency.
This setup is perfect for remote locations or those looking to reduce their environmental impact.
QUICK NOTE:
-
At The Solar Store, we’ve helped thousands of customers take the leap into off-grid solar by providing off-grid and RV solar kits. And so, we know the questions that come up.
-
Our goal is to make things easy to understand so you feel confident about your choices. If you ever get stuck or need help figuring out what system matches your needs, our support team is always here to help. Just reach out. We’re happy to guide you.
Off-Grid Solar System Design Calculation
Designing an off-grid solar system starts with understanding how much energy you need and ensuring the system can provide that power consistently.
Calculating Your Energy Needs
To begin, you need to determine how much energy your household uses on a daily basis. This is done by calculating the watt-hours for each appliance you plan to run on solar power.
-
List Your Appliances: Write down the devices you want to power, such as lights, fridge, TV, etc.
-
Estimate Power Consumption: Look at the power rating (usually in watts) of each appliance. Then, multiply the power rating by the number of hours you plan to use it each day. For example: A 100W light bulb running for 5 hours = 100W × 5 hours = 500 watt-hours (Wh). A 200W fridge running for 8 hours = 200W × 8 hours = 1,600 Wh.
-
Calculate Total Watt-Hours: Add up the watt-hours for all appliances to get your total daily energy consumption. For instance, if your total energy consumption is 2,500 Wh per day, that's the amount of energy your system must generate.
Sizing the Solar Panels
Now that you know how much energy you need, it’s time to calculate how many solar panels are required to meet this demand. This depends on the average sun hours your location gets each day.
For example, if your location receives an average of 5 sun hours per day, and you need 2,500 Wh daily, you would divide your total energy need by the sun hours:
-
2,500 Wh ÷ 5 sun hours = 500W of solar panels.
This means you need 500 watts of solar panel capacity to meet your daily needs, which could be achieved with two 250W panels.
Sizing the Battery Bank
Your battery bank must store enough energy to cover your needs when there is no sunlight. A general rule is to size the battery bank to provide 2-3 days of autonomy (backup power).
For example, if your daily consumption is 2,500 Wh, and you want 2 days of autonomy:
-
2,500 Wh × 2 days = 5,000 Wh of battery capacity.
This ensures that you can use stored energy for up to 2 days without relying on solar generation.
How to Install an Off-Grid Solar System
Except you’re experienced in installation, this is usually the part handled by the contractor. However, it pays to have a knowledge of what it entails.
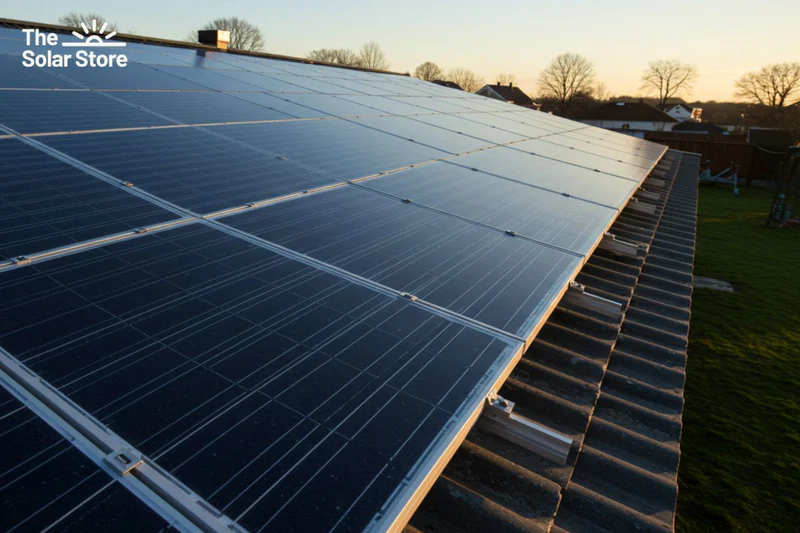
Step 1: Mounting the Solar Panels
First, install the racking system to secure the solar panels. For roof-mounted systems, find the rafters in your roof and install the racking with appropriate anchors.
If you're installing on the ground, ensure the racking is set up to hold the panels at the optimal angle for sunlight exposure. Once the racking is in place, mount the solar panels. The panels should be aligned to face the sun and fastened securely.
Step 2: Installing the Charge Controller
The charge controller is connected between the solar panels and the battery bank. It regulates the power coming from the panels to prevent overcharging the batteries. Mount the charge controller near the battery bank, ensuring easy access for maintenance and monitoring.
Step 3: Connecting the Battery Bank
Batteries should be installed in a well-ventilated area to avoid overheating. Connect the batteries in series or parallel, depending on your system’s voltage requirements.
For example, you might connect several 12V batteries to create a 48V battery bank. Use heavy-duty cables to make the connections, ensuring that all connections are tight and secure.
Step 4: Wiring the Inverter
The inverter converts the DC power from the batteries into AC power for your household appliances.
Connect the inverter to the battery bank and the AC loads (appliances) using the appropriate cables and fuses for safety. If you are connecting a backup generator, make sure to wire it to the system so it can kick in when necessary.
Step 5: Testing the System
Once everything is connected, it’s time to test the system. Check that the solar panels are producing power, the charge controller is regulating the flow of energy, and the inverter is converting DC to AC. You should monitor the system for a few days to ensure everything is functioning properly.
DIY Solar System Kits for Beginners
For those looking to embrace solar energy without the hassle of selecting individual components, DIY solar system kits are an excellent solution.
These kits are designed for ease of installation, making them perfect for beginners who want to install their off-grid solar system themselves while saving on labor costs.
Why Choose a DIY Solar System Kit?
DIY solar kits come with everything you need to get your off-grid system up and running. They typically include solar panels, a charge controller, an inverter, batteries, and all the necessary wiring and mounting hardware. DIY kits also offer significant cost savings.
Without the need to hire professionals for installation, you only pay for the components themselves. Plus, the learning experience can be invaluable, as it helps you better understand how your system works and allows you to make future adjustments or expansions on your own.
The Solar Store: Our Popular DIY Off-Grid Solar Kits
-
EG4 Off-Grid Solar Power System: This 3.24kW system comes with a 6,000W inverter, 8 high-efficiency 405W bifacial solar panels, and a 10.24kWh lithium battery bank. It's perfect for small homes or cabins looking for reliable off-grid power.
-
Zamp Solar Obsidian Series 100W Kit: This compact 100W kit is ideal for RVs, boats, or smaller off-grid setups. It includes everything you need to power lights, small appliances, and charge devices on the go.
Again, choosing the right kit depends on your energy needs, the size of your space, and your budget. If you ever get stuck or need help figuring out what system matches your needs, you can get a free quote for your off-grid solar system. Just reach out. We’re happy to guide you.